If you have any issues with your gut, or with any aspect of your health for that matter, you have probably heard that you should be including fermented foods in your diet.
I learned about the health benefits of fermented foods when I read Natasha Campbell-McBride’s book “Gut and Psychology Syndrome.” She recommended homemade fermented yogurt and fermented vegetables as part of her diet protocol. I decided that I wanted to try my hand at making homemade sauerkraut and then I would go from there. Like we all do when faced with a question, I searched the internet. It didn’t take long for confusion and frustration to set in.
So Many Different Recipes, Which One Is Right?
Some recipes said to use a special jar while others said, bah, you don’t need a special jar, just stuff the cabbage into a mason jar or open-air crock and cover it with something – like a dishrag or cheesecloth secured with a rubber band. They said, “keep it under the brine and you’ll be fine.”
Some used a measured amount of salt, while some said, “just sprinkle a handful of salt over the cabbage.”
The temperature and time were not consistent either.
After spending some time researching, I figured I at least needed a mason jar with a special lid. I purchased a flat lid with a hole surrounded by a rubber grommet, which enabled an airlock to fit into place. Then I tightened the lid onto the mason jar by screwing on the ring. I picked a recipe that looked good and made my first batch of sauerkraut. Within about a week or two, I saw mold growing on top of the brine.
Now I have taken 3 microbiology/food chemistry classes that spanned my undergraduate and graduate education and I knew that mold was not supposed to grow in an anaerobic (without oxygen) environment. Hmmmmm, what went wrong? I eventually learned that mason jars are not airtight.
The Main Purpose of this Post is to Teach You the “Why” Behind the Recipe
I found a jar and a recipe that works, every time. Click here to go to the recipe.
Since my mold in the mason jar experiment, I have done a huge amount of research on fermentation. I have also consulted with a company that sells sauerkraut commercially. But the most helpful person to me was Kathleen Mills with Pickl-It®, the original anaerobic airlock system. You see, I called Kathleen in 2014 in a panic. I purchased a bunch of Pickl-It® jars with a grant and I added a fermentation lab to one of my graduate courses. I looked high and low but I couldn’t find any consistent recipes. Due to my mold disaster, I knew I needed to create an anaerobic environment, that is how I found Pickl-It®, but what about the other variables?
Kathleen Mills was kind enough to share her tried and true sauerkraut recipe with me and I have found that it produces consistent, mold-free kraut every time.
Because there are so many different opinions, techniques, and downright controversy in the world of fermentation, I wanted to present the science behind why this particular recipe works.
There are Many Variables When it Comes to Making Kraut
Sauerkraut fermentation occurs through the action of lactic acid bacteria (LAB). The LAB are naturally found on the cabbage leaves. In order to make consistent, healthy, and safe kraut, you need to provide the right conditions that favor LAB growth. These conditions include oxygen, salt concentration, time and temperature.
Why You Don’t Want Oxygen in Your Sauerkraut
The recipe indicates that you should use a fermentation jar with a lock-top lid and airlock. The reason behind this is that you want to create an anaerobic environment.
Whether or not you need a special, anaerobic container to make ferments like sauerkraut is one of the most controversial topics that I’ve come across in the fermenting world. I’m going to spend some time discussing this so I hope you don’t get bored, but this is important. To understand where the controversy is coming from, we must go back to the basics of fermentation and the science involved.
The term fermentation can be defined in different ways. The broad term is the chemical breakdown of food products by microorganisms into simpler compounds. In relationship to metabolism, fermentation refers to the breakdown of carbohydrates into simpler compounds in the absence of oxygen.
The Critters Involved in Sauerkraut Fermentation
The LAB involved in fermentation can be characterized as facultative, meaning they break down carbohydrates into lactic acid in the presence or absence of oxygen. In addition, LAB are either homofermentative, in that they create just lactic acid and carbon dioxide, or they are heterofermentative, meaning they create lactic acid, carbon dioxide, acetic acid, and some other compounds. You want to have a mixture of all of these compounds to create a full-bodied flavor, but lactic acid is the most important. Lactic acid is what makes sauerkraut tangy and it kills off undesirable microorganisms.
A major player in sauerkraut fermentation is Lactobacillus plantarum (L.plantarum). It is a facultative, heterofermentative LAB and with the right conditions, produces high acidity from the copious amount of lactic acid it produces.
With Oxygen, Unwanted Compounds are Produced
In the absence of oxygen, L. plantarum converts carbohydrates into lactic acid-which quickly drops the pH, killing off other bacteria that you don’t want in your ferment. But in the presence of oxygen, the lactate is converted to acetate/acetic acid (the characteristic vinegar flavor compound) as well as hydrogen peroxide.1 A little bit of acetic acid is fine, in fact, one study found that a high-quality kraut has an acetic acid to lactic acid ratio of 1:4.2 But it has to be balanced, which we will talk about later. In addition, you don’t want a bunch of hydrogen peroxide in your sauerkraut either. It will not only kill off your LAB, creating an unfavorable environment but who wants to eat something that contains hydrogen peroxide?
Oxygen Can Lead to Spoilage
Here’s another issue with oxygen-you can get unwanted microorganisms growing and causing your kraut to spoil instead of fermenting.
In “Applications of Biotechnology in Traditional Fermented Foods” the process of making sauerkraut is described.2 In the initial phase, respiration occurs, not fermentation. Respiration is the production of energy using oxygen. There is oxygen present initially and the microorganisms in the cabbage will quickly use it up.
Once the oxygen is gone, an anaerobic environment is created. It is important to keep the environment anaerobic by using an airtight seal. In order to get an airtight seal, the lid of the jar should have a rubber seal and then have a locking mechanism. Lids that are threaded on, like a mason jar, cannot get airtight. The only way to create an anaerobic environment in a mason jar is to seal the lid to the jar with heat (like you would if you were canning food). “If this seal is not airtight, aerobic bacteria and yeasts grow on the sauerkraut surface. These yeasts produce undesirable chemicals and metabolize lactic and acetic acids produced by lactic acid bacteria.”2
Remember, you want lactic acid because it protects your ferment from unwanted microorganisms by reducing the pH. You don’t want the yeasts gobbling it up. If anaerobic conditions aren’t maintained, these unwanted microorganisms will grow, causing spoilage.3
What About Mold?
Many recipes and blogs about fermentation will tell you that if you get mold on the surface of your ferment, then it is fine to just scrape it off. They say that underneath the mold is a fine-looking kraut that looks, tastes and smells just fine.
I am simply not comfortable with scraping mold off of my sauerkraut before I eat it. In fact, I learned from teaching food science and taking microbiology courses that mold has tentacles. These tentacles can reach far down into soft food. Much farther than what the eye can see.
According to food safety guidelines, if you have mold growing in hard cheese like cheddar, then you can cut off 1 inch from around and below where the mold stops growing. Typically, mold can’t penetrate more than an inch in hard cheese. But if the mold is in soft cheese, then you have to toss it. Sauerkraut is liquid and there is no telling how far the mold has penetrated, so you may not get it all by scraping off the top layer.
The best way to keep mold out is to keep oxygen out!
Do Commercial Sauerkraut Producers Worry About Oxygen?
The research makes it pretty clear that sauerkraut should be made in an anaerobic environment. But sometimes research settings are different from what is done in industry or real life. Do companies that make sauerkraut commercially use anaerobic methods or do they ferment their kraut in lightly covered, open vats?
I emailed Richard Goldberg, owner of Wildbrine Fermented Foods, in February 2015 to investigate this question. I see this product sold at the natural health food store in my area. I asked him if they used strict, anaerobic techniques when fermenting their vegetable products. This was his response “yes, our products are made in an anaerobic environment.”
Well, that’s pretty clear.
What Else Can Go Wrong?
According to an article published in the journal “Products of Chemistry,” when your sauerkraut goes wrong, it is due to oxygen somehow getting into the fermentation vessel.2 If the sauerkraut has an off color, it is because of oxygen. Off flavors and odors? Oxygen. Aerobic molds and yeasts that shouldn’t be in the ferment will produce volatile organic compounds that can create these off-flavors and odors.2
But I Make Sauerkraut Without an Anaerobic Jar and It Turns Out Fine
I teach fermentation workshops in my community and some of the participants tell me that they use mason jars or open crock ferments without experiencing any mold or spoilage. They certainly haven’t felt like their method is making them ill. My educated guess is that they might be using more salt and that is preventing unwanted microorganisms to grow. Or maybe the carbon dioxide that forms in the air space between the kraut and the lid is enough to keep the environment anaerobic. I can’t vouch for this experience. All I can do is present what I have learned in the literature and from speaking with other experts.
It looks like there are two different camps here-the purist and the more laid back.
Just remember, LAB will ferment cabbage into kraut, regardless of aerobic or anaerobic conditions, because many are facultative. But it is the by-products that are produced in the presence of oxygen that I am most concerned with. Over time, these by-products may impact a person’s health. I work with clients who have serious health issues and I don’t want to chance it with them or myself.
After all of this research, I decided that it was best practice to use an anaerobic fermentation jar with a lock top lid and airlock.
Now on to the other variables: salt concentration, temperature, and time
The Salty Brine
According to the recipe, for every 5 lbs of cabbage, you will need about 32 grams of salt. Sauerkraut is considered a self-brining ferment. You sprinkle salt on the leaves and over time, the salt will draw the water out of the cabbage. Brine is a salty medium that serves many purposes:2
- It inhibits the growth of undesirable microorganisms
- It prevents softening of the cabbage
- It contributes to the overall flavor
- It helps control the type and extent of lactic acid fermentation
Sauerkraut brine should be approximately 2% concentration.3
The salinity directly favors LAB growth and inhibits the unwanted microbes. Some of my workshop participants that are using open crocks have told me that they add so much salt to their kraut that they have to rinse it off before eating it. They certainly can’t drink the brine, which is a crime, because the brine contains a huge amount of nutrients.
Let me repeat that-drink the brine, it is where the nutrients are. You certainly don’t want to be throwing it out!
Traditionally, the brine was consumed daily while the sauerkraut was used in cooking. According to Kathleen Mills with Pickl-It® “the “cabbage juice” as my grandparents called the cabbage brine, is rich in nutrients, traditionally consumed 1-tablespoon daily. The kraut was wrung out like a wet dishrag, used in cooking, added to soups, goulashes, stews, or as a hotbed under grilled sausages (Kathleen Mills, Pickl-It®, e-mail communication, November 2018).
The reason why my fermentation workshop participants added too much salt is because they wanted to make sure the undesirable microorganisms were destroyed. However, too much salt (>3%) can select for the growth of homofermentative LAB and restrict the growth of heterofermentative LAB. Again, you really want a balance of these two groups of microbes, not too much, not too little, to get a great, full-bodied flavor. On the other hand, two low salt (<0.8%) will result in mushy, poor-quality sauerkraut.4
OK, back to the oxygen, you don’t want it.
With an anaerobic environment, you can use less salt. This is because fermenting anaerobically reduces the risk of contamination, so you don’t need all of that salt.
Researchers published a study on the use of anaerobic tanks for pickle fermentation.5 When this article was published in 1999, about 40% of the pickles produced in the US were fermented in open vat tanks exposed to the environment. In order to prevent spoilage, they had to use large amounts of salt.
Trying to dispose of all of this salt was becoming a serious environmental issue and that was the topic of the research study. When the pickles were switched from open vat fermentation to anaerobic fermentation, the researchers were able to drop the salt concentration by 50%, without the worry of contamination. Problem solved! Just for context-sauerkraut is a 2% brine, while pickles should be a 4% brine.
The recipe provides the correct amount of salt in order to achieve a 2% concentration. You will need a food scale, which is very inexpensive and can be found at any discount store or online.
Optimum Temperature
There are two temperature recommendations in the recipe: 1) room temperature for 10 days; 2) refrigerator temperature for the rest of the time. According to the researchers, the optimum temperature for sauerkraut is 59-68oF. If the temperature is too high, it can result in an immature flavor. If the temperature is too low it can prevent the LAB from forming enough lactic acid in the beginning; therefore, increasing the risk of spoilage from unwanted microorganisms.4
But how many of us keep our homes between 59-68oF? Many people would put their kraut in their basements, but there is huge variability in typical basement temperatures. Weather conditions, time of year, amount of insulation, and location (whether at the base of a wall or the center of the basement) all impact the temperature.6
Given the fact that most of us don’t live in homes this cold or have refrigerators set at 60oF, the temperature used in this recipe is a compromise to adapt to our living conditions. The ferment starts out at room temperature to kick start the LAB activity, then it should be moved to the refrigerator after 10 days to slow down fermentation in order to develop a rich, full-bodied flavor.
Time-It is Longer Than You Think
The total fermentation time suggested in the recipe is approximately 10 days on the counter with 10-12 weeks in the refrigerator. This is another area where the recipes are all over the place. Some said to eat the sauerkraut after a few days on the counter, some said it should ferment on the counter for 4 weeks.
Time is very important. This is because sauerkraut fermentation occurs in 4 phases and you need to wait before you eat the kraut for these phases to run their natural course.
It is interesting to note that cabbage contains only a very small percentage of LAB, like 0.5-1.5% of the total microbial population,4 but they will end up predominating as time goes on. Here is the breakdown of the 4 phases, published in the Handbook of Fermented Food:4
- Fermentation begins as soon as you pack the cabbage into the vessel. My note: it is important that you pack the cabbage tightly to remove air pockets. Also, the thinner you slice the cabbage, the tighter you will be able to pack the cabbage. The microorganisms that are aerobic (Pseudomonas, Flavobacterium, and Acinetobacter) quickly consume the oxygen and this takes around 2-3 days.
- The heterofermenter Leuconostoc mesenteroides will quickly take over due to the lowering of the pH, the creation of an anaerobic environment, and the proper brine concentration. This microorganism produces lactic and acetic acids which further drop the pH. Interestingly, this microorganism is mainly responsible for setting the color of the ferment and stabilizing vitamin C. Lactobacillus brevis, a more acid and salt-tolerant species will also start predominating. This stage occurs around days 3-6, depending upon the temperature.
- In the third phase, homofermentative lactobacilli will start taking over. The main player here is Lactobacillus plantarum. At this phase, a large majority of the carbohydrates are being fermented into lactic acid. The pH at this point will be around 3.8-4.1. According to the handbook, most commercial sauerkraut will be unpacked and pasteurized at this point.
- For those of us who are not pasteurizing our kraut, the last phase is allowed to occur. In this final phase, Lactobacillus brevis and other organisms will ferment sugars that were liberated during the other phases of fermentation. At this point, the pH can get as low as 3.4 which is what is recommended.
I recreated this figure from Fleming et al7 to visually show the drop in pH as time goes by. The entire fermentation process takes at least 60 days according to these authors.
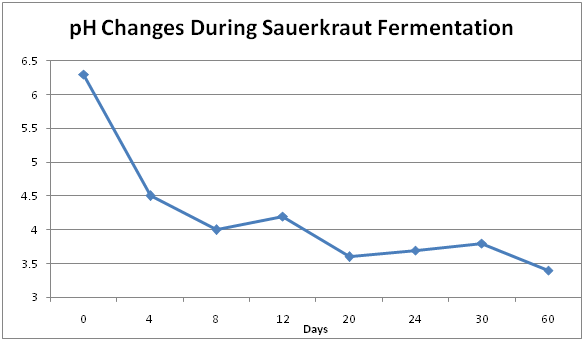
Source: Adapted from Fleming, McFeeters, Humphries, 1988
You can see that it takes time for the pH to decrease, with the ideal range for fully fermented sauerkraut to be around 3.2-3.4.8
What Did Our Ancestors Do?
As you were reading through this post, you were probably thinking, “but our ancestors didn’t do all of this ‘special stuff’ when they fermented foods.” Or did they? Some of them went to great lengths to create an anaerobic environment. If you ever watched Anthony Bourdain’s “No Reservations-Korea,” he visits a rural town in Korea where thousands of pounds of kimchi are made. The kimchi is packed into large urns and buried in the earth for 6 months. They did this for temperature control, but it also created an anaerobic environment. Our ancestors may have also used water-sealed crocks and animal stomachs or sealed their containers with wax (Kathleen Mills, Pickl-It®, phone conversation, 2014).
There are many things that I didn’t get a chance to discuss, like all of the wonderful benefits of fermented food. You may have become interested in fermented foods because of the probiotics, but they are just one benefit out of many. I also would like to touch on histamines someday. Histamines are the main reason why people shy away from fermented foods, but there is a lot more to that story than assuming that all ferments are high in histamine. So much to talk about, maybe in another post!
Anyway, I hope that this post has inspired you to embark on your own fermentation journey. It is very rewarding and your health will thank you!
References
- Adlam K. Lactobacillus plantarum and its biological implications. 2014. https://microbewiki.kenyon.edu/index.php/Lactobacillus_plantarum_and_its_biological_implications. Accessed December 23, 2018.
- Oberg CJ, Brown RJ, Kauffman B. Preservation by fermentation focusing on the chemistry and microbiology of vegetables. Prod Chem. 1993;70(8):653-656. doi:10.1021/ed070p653.
- National Research Council (US) Panel on the Applications of Biotechnology to Traditional Fermented Foods. Applications of Biotechnology in Traditional Fermented Foods. Washington, D.C.: National Academies Press; 1992.
- Farnworth ER. Handbook of Fermented Food. 2nd ed. Boca Ratan, FL: Taylor & Francis; 2008.
- Humphries EG, Fleming HP. Anaerobic tanks for cucumber fermentation and storage. J Agric Eng Res. 1989;44(C):133-140. doi:10.1016/S0021-8634(89)80077-0.
- Latta JK. Basement Wall and Floor Temperatures. (National Research Council of Canada, ed.). NRC Publications Archive; 1977.
- Fleming HP, McFeeters RF, Humphries EG. A fermentor for study of sauerkraut fermentation. Biotechnol Bioeng. 1988;31(3):189-197. doi:10.1002/bit.260310302.
- Perez-Diaz I, Breidt F, Buescher R, et al. Fermented and Acidified Vegetables. In: Compendium of Methods for the Microbiological Examination of Foods, 4th. Washington, D.C.: APHA Press; 2013:1-22.
Sauerkraut Recipe
This recipe was adapted from Kathleen Mills with Pickl-It®, with permission. I am not affiliated with Pickl-It® or make money off of the sales of this product. I am just a very happy customer and like to share products that are successful.
What you will need:
- Fermentation jar with lock-top lid and airlock (I personally use a Pickl-It® for all of my ferments. They are inexpensive and once you purchase a few jars, you will use them over and over again. You can purchase Pickl-It® fermentation jars at this website: www.pickl-it.com. Update 2019: The website for Pickl-It® is currently unavailable. You can purchase lids from this website and use Fido jars or purchase a limited supply of Pickl-It® kits. The Probiotic Jar has similar products on this website although I haven’t had experience with them: http://www.probioticjar.com/.
- Digital food scale
- Mandolin if desired (go ahead and get one-it is very difficult to slice the cabbage thin enough without one). Having thin, uniform cabbage will enable you to pack it into the jar tighter, eliminating air pockets.
- 1-2 carrots
- Enough shredded cabbage to fill your jar up to the shoulder when tightly packed. This is important in order to maintain the headspace needed to create an appropriate layer of gas.
- Salt without anti-caking agents. For every 5 lbs of cabbage, you will need 32 grams of salt (for 1 pound of cabbage = 6-7 grams of salt). Because you are using an anaerobic jar, the salt concentration will be much lower.
- 1 -2 Tbsp caraway seeds if desired
Note: you really need a scale for this recipe because it is important that your brine ends up being a 2% salt concentration; therefore, weighing your salt and cabbage is important to reach this concentration.
Directions:
- Remove any wilted outer leaves from the cabbage
- Cut the cabbage in half and then in quarters
- Slice the cabbage to the equivalent of very thin ribbons. It is important to get the ribbons as uniform as possible. I use a mandolin for this purpose.
- In a large bowl, toss the cabbage with the sea salt and caraway seeds (if using)
- After 5 minutes or so, your cabbage will have created its own brine.
- Place the cabbage and the brine in a fermentation vessel (like a Pickl-It®) and press firmly with a wooden spoon. Pack the vessel as tight as you can. This will eliminate air pockets.
- Using a vegetable peeler, thinly slice peels from a carrot and layer it on top of the ferment, similar to a lattice for a pie. This will help keep flyaways from getting above the brine. It is helpful to place a weight on top of the cabbage to keep it submerged, like the DUNK-R® from Pickl-It®.
- If you don’t have enough brine, that is OK, just wait a little longer, it will come. If you still don’t have enough brine, then make a 2% brine: 2 cups of water with 9-10 grams of salt; 1 quart of water per 19 grams of salt; or 100 mls water per 2 grams of salt. Add the brine to the ferment up to the knuckle of the jar.
- You should have at least 1 inch of brine covering your cabbage.
- If there is too much space between your cabbage and lid, then you can add chopped carrots to the shoulder of the jar.
- Seal the lid and put water in your air-lock to the “fill” line and place in the rubber grommet on the lid.
- Check the ferment after a couple of days. Sometimes the cabbage will experience upheaval due to the gasses pushing the cabbage to the top and the brine to the bottom. It is OK at this point to open the jar and push the cabbage back down.
- Leave the cabbage on the counter to ferment at room temperature for 10 days.
- You can then transfer the cabbage (in the jar with the airlock) to the refrigerator for 10-12 weeks. By then, you should have a nice and tasty sauerkraut. Enjoy!
Note: If you have any kind of digestive disorders, go slowly when eating any type of fermented food. You should start with ingesting the brine first, then move to the vegetable. It may take some time for your digestive system to adjust.

